PLAY TOYS YOU CAN MAKE WITH RECYCLED MATERIALS
Recycling is the process of converting waste materials into reusable materials or new products. It involves collecting and processing materials that would otherwise be thrown away as trash and transforming them into raw materials to produce new items. Recycling helps conserve natural resources, reduce energy consumption, and minimize pollution and waste in the environment.
There are many fun and creative toys that you can make using recycled materials.
Here are a few ideas to get you started with recycling:
1. Cardboard Box Dollhouse

A cardboard box dollhouse is a creative and budget-friendly alternative to store-bought dollhouses. It allows you to repurpose a cardboard box into a miniature house for dolls or action figures. Here’s a simple guide to creating a cardboard box dollhouse:
Materials you’ll need:
- Cardboard box (size depends on your preference)
- Craft knife or scissors
- Ruler
- Pencil
- Decorative paper or wrapping paper
- Glue or tape
- Markers, colored pencils, or paints (optional)
- Miniature furniture or household items (optional)
Instructions:
- Select a sturdy cardboard box that is large enough to accommodate your dolls or action figures. The size of the box will determine the scale of your dollhouse.
- Determine the layout and design of your dollhouse. Use a pencil and ruler to mark where you want to create rooms, doors, windows, and other features. Consider creating multiple levels or dividing the box into different rooms.
- Use a craft knife or scissors to carefully cut out the openings for doors and windows. Make sure to keep the edges clean and smooth.
- Decorate the walls of your dollhouse. You can use decorative paper or wrapping paper to cover the interior walls. Measure and cut the paper to fit each wall, and then glue or tape it in place. You can also use markers, colored pencils, or paints to add additional details or designs.
- Create flooring for each room. You can use the same decorative paper or create your own flooring using colored paper, fabric, or even small tiles. Cut the flooring materials to fit each room and attach them to the floor using glue or tape.
- Add any additional features or decorations you desire. This could include wallpaper for the walls, curtains for the windows, or artwork to hang on the walls. Get creative and personalize your dollhouse to your liking.
- If you have miniature furniture or household items, arrange them inside the dollhouse to create a cozy and realistic setting. You can also make your own furniture using cardboard, popsicle sticks, or other craft materials.
Remember to use caution when using scissors or craft knives and always ask an adult for assistance if needed. Enjoy the process of creating your cardboard box dollhouse and have fun playing with it once it’s finished!
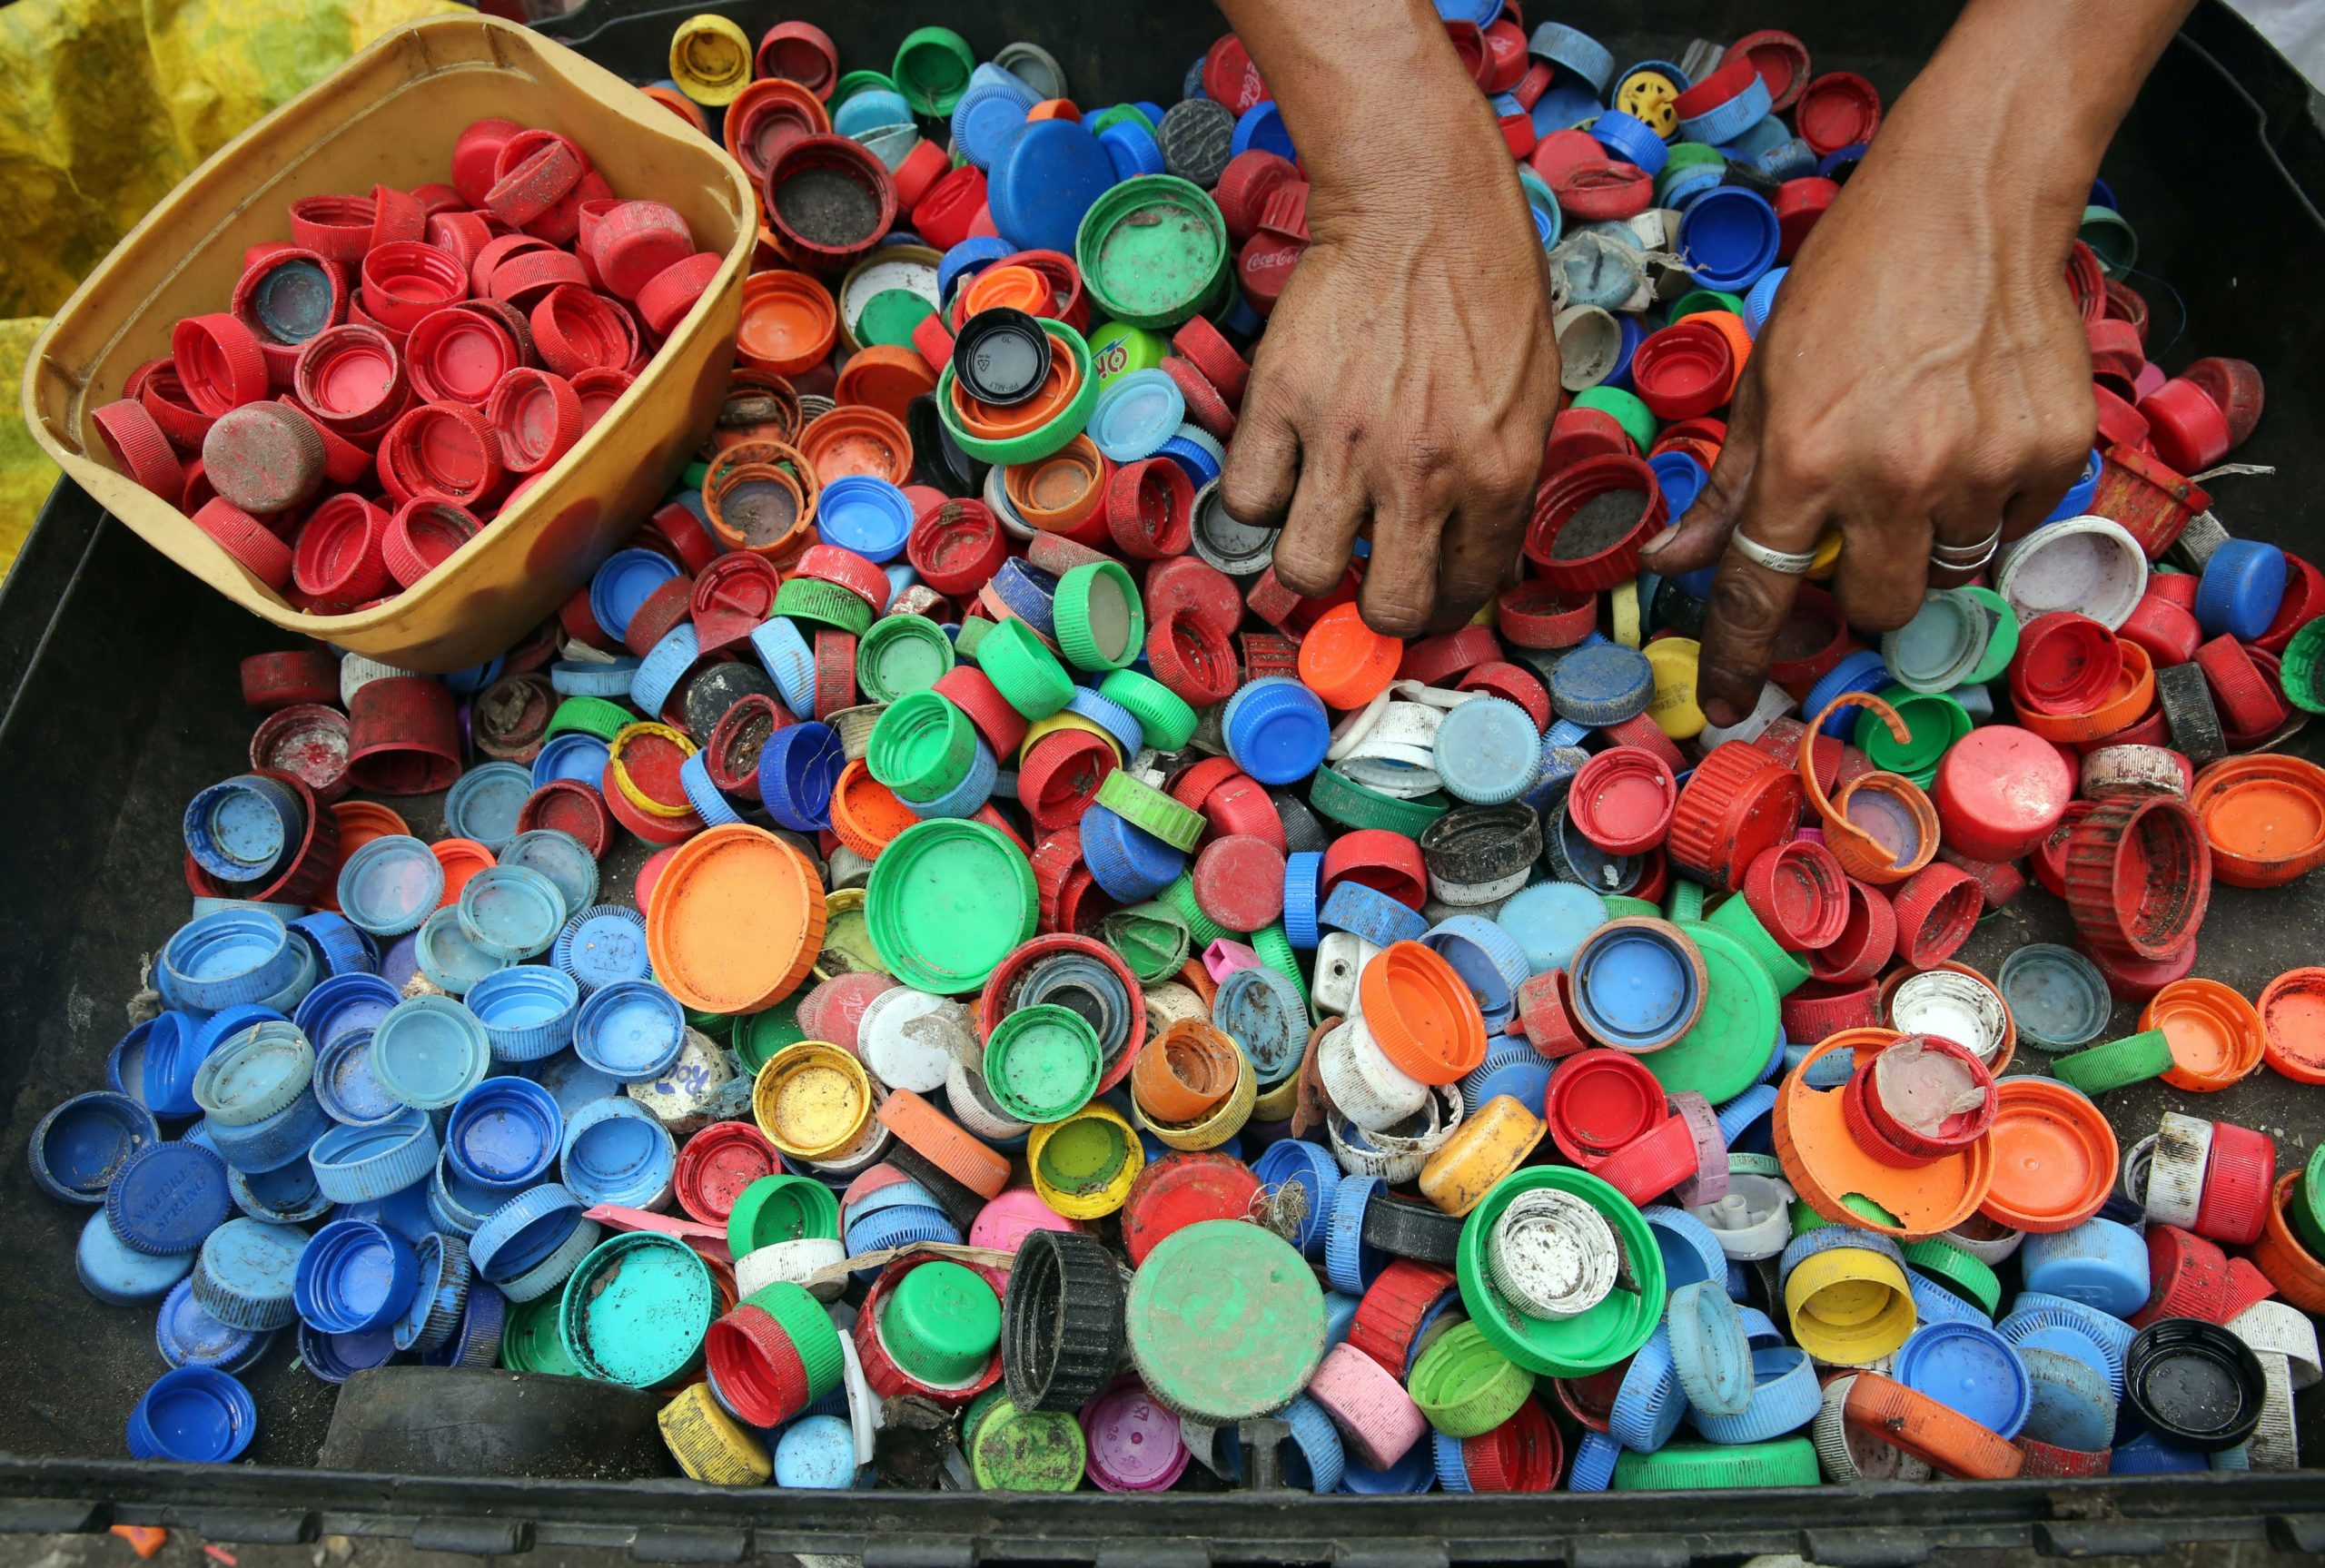
2. Bottle Cap Checkers

Bottle Cap Checkers is a game that can be played using bottle caps as game pieces and a checkers board. It is a variation of the traditional game of checkers that adds a unique twist to the gameplay.
To play Bottle Cap Checkers, you’ll need the following materials:
- A checkers board: This is the standard 8×8 game board with alternating dark and light squares.
- Bottle caps: These will serve as the game pieces. You can use two different types of bottle caps, such as different colors or sizes, to represent the two players.
- Optional: A container or bag to hold the bottle caps.
Here are the basic rules of Bottle Cap Checkers:
- Set up the board: Place the checkers board on a flat surface. Each player takes turns placing their bottle caps on the dark squares of the first three rows closest to them. The caps should be placed diagonally, one cap per square.
- Determine the starting player: Decide who goes first. Players can use any method they prefer, such as flipping a coin or playing rock-paper-scissors.
- Movement rules: The bottle caps move diagonally, one square at a time, in a forward direction. Only one cap can occupy a square at any given time. Caps cannot move backward unless they reach the opponent’s back row and become “kinged” (explained below).
- Capturing opponent’s caps: If a player’s cap is adjacent to an opponent’s cap and there is an empty square diagonally behind the opponent’s cap, the player can “jump” over the opponent’s cap and capture it. The opponent’s cap is removed from the board.
- Multiple captures and “kinging”: If a capturing move leads to another capturing opportunity, the player can continue to jump over the opponent’s caps and make additional captures in the same turn. This applies to both regular caps and “kinged” caps (explained next).
- “Kinging” a cap: When a player’s cap reaches the last row of the opponent’s side, it becomes “kinged.” The player can stack another bottle cap of the same color on top of the kinged cap to indicate its status. Kinged caps can move and capture both forward and backward diagonally.
- Winning the game: The game continues until one player captures all of their opponent’s caps or blocks their opponent’s caps from making any legal moves. The player achieving this is declared the winner.
Remember, these rules are a variation of traditional checkers, adapted to be played with bottle caps. You can modify or add rules to suit your preferences, as long as all players agree on the changes.
Enjoy playing Bottle Cap Checkers!
3. Tin Can Robots

Tin can robots, also known as tin can or tin canister robots, are simple robots made from recycled materials, often using tin cans or other metal containers as their main body. These robots are a popular do-it-yourself (DIY) project, especially among hobbyists, students, and those interested in robotics.
The concept behind tin can robots is to repurpose household items and turn them into functioning robots. The primary material used is usually a metal canister, such as an empty food can or a coffee tin. Other commonly used components include motors, batteries, wires, switches, and various decorative items like googly eyes or colorful paints.
To create a tin can robot, you typically need to follow these steps:
- Gather materials: Collect an empty tin can or any other suitable metal container, along with other necessary components like motors, batteries, wires, and switches. You may also gather additional decorations if desired.
- Design and plan: Decide on the design and functionality of your robot. Consider how you want it to move, what actions or features it should have, and how the components will be arranged inside the canister.
- Prepare the canister: Clean and dry the tin canister thoroughly. Remove any sharp edges or protrusions that may pose a safety risk.
- Attach components: Use adhesive or screws to attach the motors, batteries, and other electronic components inside the canister. Place the switches and wires in appropriate positions, ensuring they are securely connected.
- Wiring and circuitry: Connect the components together using wires, making sure to follow electrical safety guidelines. Create a circuit that powers the motors and controls their movement.
- Decorate: Give your tin can robot some personality by adding decorative elements. Paint the canister, attach googly eyes, or use other materials to bring your robot to life.
- Test and refine: Once the robot is assembled, test its functionality and make any necessary adjustments. Ensure that the motors work correctly, the wiring is secure, and the robot moves as intended.
Remember to exercise caution when working with electronics and electrical components. If you’re new to robotics or DIY projects, it’s always a good idea to seek guidance from tutorials, books, or experienced individuals who can provide assistance and ensure safety.
Tin can robots are not usually complex or advanced robots but can be a fun way to learn about basic electronics, mechanical movements, and DIY crafting. They offer an opportunity to explore creativity while understanding the fundamentals of robotics in a hands-on manner.
READ ALSO: 5 African female warriors you should know
4. Paper Roll Binoculars

Paper roll binoculars are a simple do-it-yourself project that can be made using common household materials. They provide a fun and inexpensive way for children to explore the world around them and engage in imaginative play. Here’s a step-by-step guide on how to make paper roll binoculars:
Materials you will need:
- Two empty toilet paper rolls
- Colored construction paper or cardstock
- Scissors
- Glue or tape
- Decorative items (stickers, markers, etc.)
Instructions:
- Start by decorating the toilet paper rolls. You can wrap them with colored construction paper or cardstock to give them a vibrant look. You can also use markers or stickers to add designs or patterns.
- Once the rolls are decorated, place them side by side and determine the desired distance between the two eyepieces. This will depend on the user’s face size and comfort.
- Cut a strip of colored construction paper or cardstock that is long enough to wrap around both rolls and wide enough to cover the sides of the rolls.
- Apply glue or tape to one end of the strip and attach it to one roll, making sure the paper covers the sides. Then, wrap the strip around both rolls, securing it with glue or tape at the other end.
- To create the eyepieces, cut two circles out of colored construction paper or cardstock. The size of the circles should be slightly larger than the ends of the toilet paper rolls.
- Glue or tape one circle to each end of the binoculars, covering the exposed ends of the rolls. Make sure the eyepieces are aligned properly, allowing for comfortable viewing.
- Once the glue is dry, your paper roll binoculars are ready to use! You can further personalize them by adding decorative items like stickers, additional cutouts, or drawing on them with markers.
Now you have a pair of homemade binoculars that you can use for pretend play, birdwatching, or exploring the surroundings. Remember to supervise children while they use the binoculars and ensure they understand not to look directly at the sun or other bright light sources. Enjoy your DIY adventure!
5. Plastic Bottle Bowling

Plastic bottle bowling is a fun and eco-friendly alternative to traditional bowling. Instead of using heavy bowling balls and pins, you use plastic bottles as pins and a lightweight ball to knock them down. It’s a great game for both indoor and outdoor settings, and it’s perfect for parties, picnics, or family gatherings. Here’s how you can set up and play plastic bottle bowling:
Materials needed:
- Plastic bottles: Gather empty and clean plastic bottles of the same size and shape. You can use standard water bottles or soda bottles.
- Ball: Find a lightweight ball that is easy to grip and roll. You can use a soft foam ball or a small rubber ball.
Setup:
- Find a flat and smooth surface to set up your bowling alley. It could be a hallway, a patio, a backyard, or even inside your living room.
- Arrange the plastic bottles in a triangular formation at the end of the bowling alley. Place one bottle at the front, then two behind it, three behind those two, and so on. You can arrange them in a single line or multiple lines, depending on the space available.
- Make sure the bottles are evenly spaced and have enough room between them for the ball to pass through.
Rules of the game:
- Players take turns rolling the ball towards the pins to try and knock them down.
- The objective is to knock down as many bottles as possible in a single roll.
- Each player gets two chances (rolls) per turn.
- If all the pins are knocked down on the first roll, it’s called a strike, and the player earns maximum points for that frame.
- If some pins are left standing after the first roll, the player gets a second roll to try and knock down the remaining pins. This is called a spare.
- After each player completes their turn, the pins are reset, and the next player takes their turn.
- The game typically consists of ten frames, just like traditional bowling. The player with the highest score at the end of the game wins.
Scoring:
- Each pin knocked down earns one point.
- If a player gets a strike, they earn ten points plus the total number of pins knocked down with their next two rolls.
- If a player gets a spare, they earn ten points plus the total number of pins knocked down with their next roll.
You can modify the rules and scoring system to suit your preferences or create additional challenges to make the game more interesting. Have fun with your plastic bottle bowling game!
6. Milk Jug Birdhouse

A milk jug birdhouse is a simple and creative way to repurpose a plastic milk jug into a birdhouse for feathered friends. It provides a cozy shelter for birds and can be an enjoyable DIY project for bird enthusiasts of all ages. Here’s a basic guide to creating a milk jug birdhouse:
Materials you’ll need:
- Empty plastic milk jug
- Scissors or utility knife
- Permanent marker or pen
- String or wire
- Optional: Paint, markers, or other decorations
Instructions:
- Clean the milk jug: Make sure the milk jug is thoroughly cleaned and free of any residue or odors. Rinse it out with water and let it dry completely.
- Design the birdhouse: Use a permanent marker or pen to draw an entrance hole near the bottom of the milk jug. The hole should be large enough for birds to enter but not too big to allow predators to get in. A circular entrance hole with a diameter of about 1.5 to 2 inches (3.8 to 5 cm) is suitable for small backyard birds like sparrows or chickadees.
- Cut the entrance hole: Carefully cut along the marked line using scissors or a utility knife. Take your time and make sure to keep your fingers safe while cutting. Smooth any rough edges around the entrance hole.
- Add perches (optional): If you want to provide perches for the birds, make two small vertical cuts below the entrance hole, about half an inch (1.3 cm) long and a couple of inches apart. Insert small twigs or dowels into the cuts to create perches for the birds to land on.
- Decorate the birdhouse (optional): Get creative and decorate the milk jug birdhouse with paint, markers, or other materials. You can paint it in bright colors or use natural tones to blend in with the environment. Adding decorative elements, like flowers or bird patterns, can make it visually appealing.
- Hang the birdhouse: Use string or wire to create a loop or handle at the top of the milk jug birdhouse. Ensure it is sturdy enough to support the weight of the birdhouse when filled with nesting materials. Choose a suitable location, such as a tree branch or a sturdy hook, and hang the birdhouse securely.
- Monitor and maintain: Keep an eye on the birdhouse to see if any birds move in. Check regularly for any damage, and make repairs if needed. In the colder months, you can also provide nesting materials like twigs, grass, or small scraps of fabric nearby to encourage birds to make their home in the birdhouse.
Remember, birdhouses should be cleaned out annually to maintain hygiene and prevent the spread of diseases. Empty and clean the birdhouse after the nesting season is over to prepare for the next year.
Enjoy observing the birds that visit your milk jug birdhouse and the satisfaction of providing them with a safe and cozy shelter!
7. Egg Carton Caterpillar

The Egg Carton Caterpillar is a simple and fun craft activity for kids. It involves transforming an egg carton into a colorful caterpillar using basic art supplies. Here’s how you can make it:
Materials you will need:
- An empty cardboard egg carton
- Scissors
- Non-toxic paint or markers
- Paintbrushes (if using paint)
- Googly eyes or small stickers
- Pipe cleaners or chenille stems
- Glue
Instructions:
- Start by cutting out one cup from the egg carton. This will be the body segment of your caterpillar. Repeat this step to cut out as many segments as you want for your caterpillar. You can make it as long as you like!
- Paint each segment of the egg carton using the non-toxic paint or markers. Let your creativity shine by using different colors or patterns on each segment. Allow the paint to dry completely before moving to the next step.
- Once the paint is dry, it’s time to add some details. You can use additional paint or markers to draw lines, dots, or any other designs on each segment. You can also glue small stickers or decorative items onto the segments to make them more colorful and interesting.
- Now, attach googly eyes or small stickers to the front of the first segment to create the caterpillar’s face. You can use glue to secure them in place.
- To make the caterpillar’s antennae, take two pipe cleaners or chenille stems and bend them into a “V” shape. Glue or tape them to the top of the first segment, just above the eyes.
- Finally, it’s time to assemble your caterpillar. Apply some glue to the bottom of each segment and stack them on top of each other, aligning them to create a caterpillar shape. Press them firmly together to ensure they stick well.
And voila! You’ve created an egg carton caterpillar. You can place it on a flat surface or use a string to hang it up as a decoration. It’s a great craft project for kids to enjoy and explore their creativity.
8. Cardboard Tube Marble Run

A cardboard tube marble run is a fun and creative DIY project where you use cardboard tubes to create a track for marbles to roll down. It’s a great way to engage in hands-on learning, experiment with gravity and momentum, and encourage problem-solving skills. Here’s a step-by-step guide on how to make a simple cardboard tube marble run:
Materials you’ll need:
- Cardboard tubes (toilet paper rolls, paper towel rolls, or wrapping paper rolls)
- Scissors or a craft knife
- Tape or glue
- Marbles
Instructions:
- Collect your cardboard tubes: Gather as many cardboard tubes as you can find. You can use different sizes to create variations in the track.
- Plan your design: Think about how you want your marble run to look. Consider the length, height, and any twists and turns you’d like to include. It’s helpful to sketch a rough design on a piece of paper to guide you.
- Cut and modify the tubes: Using scissors or a craft knife, cut the tubes into various lengths and shapes. You can create straight sections, curves, ramps, and even tunnels by cutting the tubes accordingly.
- Assemble the track: Start by arranging the tubes in your desired layout. Experiment with different configurations until you find one that works well. Use tape or glue to secure the tubes together, ensuring they are stable and won’t collapse when the marbles roll through.
- Test your marble run: Drop a marble at the top of the track and watch it roll down. Observe how it moves through the different sections and make any adjustments as needed. You can add additional supports or tape the tubes to a wall or other surface for stability.
- Enhance your marble run: Once the basic track is working, you can get creative and add extra features to make it more exciting. For example, you can attach bells, chimes, or other noise-making elements to the track, or create obstacles like tunnels, bridges, or jumps using additional materials.
- Experiment and iterate: Play around with the marble run, trying different sizes and weights of marbles to see how they interact with the track. You can also adjust the angles and positions of the tubes to change the speed and trajectory of the marbles.
Remember to have fun and be creative while recycling by building and testing your cardboard tube marble run. It’s a fantastic project for both kids and adults, and you can continue to expand and modify your design as you discover new ideas and challenges.
READ ALSO: Kaakyire Kwame Appiah ft Yaa Pono & Patapaa – Ayaase Tuo
These are just a few ideas to get you started, but there are countless ways to repurpose old materials into fun toys and games.